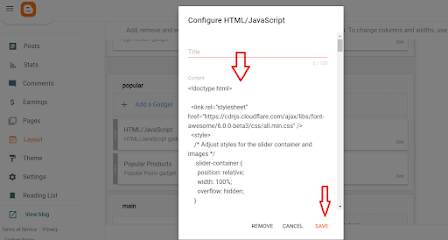
<!doctype html>
<h3 style="text-align: center;"><span style="background-color: #ffe599;"> Your Slide Headline</span></h3>
<link rel="stylesheet" href="https://cdnjs.cloudflare.com/ajax/libs/font-awesome/6.0.0-beta3/css/all.min.css" />
<style>
/* Adjust styles for the slider container and images */
.slider-container {
position: relative;
width: 100%;
overflow: none; /* You can use hidden except none if you face any issue */
}
.slider-container img {
width: 100%; /* Image width will adjust to the container */
display: none;
border: 4px solid #ddd; /* Add a 4px border to the images */
}
/* Style for the dots container */
.dots-container {
display: flex;
justify-content: center;
margin-top: 10px;
}
.dot {
width: 10px;
height: 10px;
border-radius: 50%;
background-color: #bbb;
margin: 0 5px;
cursor: pointer;
}
/* Active dot style */
.active {
background-color: #555;
}
/* Arrows style */
.arrow {
position: absolute;
top: 50%;
transform: translateY(-50%);
cursor: pointer;
font-size: 28px; /* Increase the font-size for bigger arrows */
padding: 8px;
color: #555;
background-color: transparent; /* Set the background to transparent */
border: none; /* Remove the border */
opacity: 0; /* Hide the arrows by default */
transition: opacity 0.3s ease; /* Add a smooth transition */
}
.arrow.left {
left: 5px;
}
.arrow.right {
right: 5px;
}
/* Show the arrows when hovering the slider container */
.slider-container:hover .arrow {
opacity: 1;
}
/* Hover effect on arrows */
.arrow:hover {
background-color: #ddd;
}
/* Wider than 375px */
@media screen and (min-width: 376px) {
.slider-container {
height: 100%; /* Set the desired height for the slider on wider screens */
}
.dots-container {
margin-top: 5px;
}
.dot {
width: 8px;
height: 8px;
margin: 0 3px;
}
}
</style>
<div class="slider-container">
<!-- Replace the image URLs and links with your actual image URLs and target URLs -->
<a href="#" target="_blank"> <img src="#" /></a>
<a href="#" target="_blank"> <img src="#" /></a>
<a href="#" target="_blank"> <img src="#" /></a>
<!-- Add more images here as needed -->
<div class="arrow left" onclick="showPrevImage()"><i class="fas fa-chevron-left"></i></div>
<div class="arrow right" onclick="showNextImage()"><i class="fas fa-chevron-right"></i></div>
</div>
<div class="dots-container"></div>
<script>
// JavaScript for the image slider with dots
const sliderContainer = document.querySelector('.slider-container');
const images = sliderContainer.querySelectorAll('img');
const dotsContainer = document.querySelector('.dots-container');
// Create dots according to the number of images
images.forEach((image, index) => {
const dot = document.createElement('span');
dot.classList.add('dot');
dot.addEventListener('click', () => showImage(index));
dotsContainer.appendChild(dot);
});
let currentSlide = 0;
function showImage(slideIndex) {
if (slideIndex < 0 || slideIndex >= images.length) return;
images.forEach((image) => image.style.display = 'none');
images[slideIndex].style.display = 'block';
const dots = dotsContainer.querySelectorAll('.dot');
dots.forEach((dot, index) => {
if (index === slideIndex) {
dot.classList.add('active');
} else {
dot.classList.remove('active');
}
});
currentSlide = slideIndex;
}
// Show the first image initially
showImage(currentSlide);
// Auto-advance the slider (optional)
function autoAdvance() {
currentSlide = (currentSlide + 1) % images.length;
showImage(currentSlide);
}
// Set the interval for auto-advance (change the duration as needed)
setInterval(autoAdvance, 2000); // Advance every 2 seconds
// Function to show the previous image
function showPrevImage() {
currentSlide = (currentSlide - 1 + images.length) % images.length;
showImage(currentSlide);
}
// Function to show the next image
function showNextImage() {
currentSlide = (currentSlide + 1) % images.length;
showImage(currentSlide);
}
</script>
</!doctype>